How to lay linoleum on a wooden floor: installation FAQs. Laying linoleum on a wooden floor with your own hands Laying linoleum on an old wooden floor
Linoleum is a practical and visually attractive floor covering that is found in houses, apartments, dachas, offices, shopping centers, public institutions... Almost everywhere. How to lay linoleum, how to do it correctly - read on.
On what basis
Even when choosing a floor covering, the question arises of what to lay linoleum on. Is it necessary to prepare the foundation and, if so, how seriously? The answer is simple: linoleum can be laid on any base. The main thing is that it is smooth, durable and clean. Preparation takes place and can be easy and quick if the base is level. In this case, the floor is simply cleaned and dried. If the floor has potholes or large uneven surfaces, preparation takes longer. For correction, screed or self-leveling mixtures can be used; dry screed with sheet building material (plywood, OSB, MDF boards) is also used. It all depends on the type of base.
Concrete and wood floor
You can easily lay linoleum on a concrete floor. In general, there may be differences on the surface, the main thing is that they are not local - small and deep pits and tubercles are excluded. There may be changes, but they are smooth. If there are significant unevennesses, it is better to fill in a leveling screed before laying linoleum.

This finishing coating is also laid on a flat wooden floor. Many people think that the wood will rot underneath it. If the wood is dry, without signs of infection with fungi and mold, then nothing will happen to it. When laid correctly, a sealed layer is obtained, so that moisture does not penetrate inside. If there are seams, they are welded so that moisture penetration into them is unlikely. To prevent water from getting under, choose wide models and press them well to the floor. A more reliable way is to lay self-adhesive tape under the linoleum along the perimeter for sealing.
If the boardwalk itself is made correctly, with normal ventilation, then there is no reason for it to rot. If you are very worried, before laying linoleum, treat the floor with antiseptics.
If there are noticeable cracks in the plank floor, they will be visible on the flooring after some time. If they are small, they can be puttied and the surface can be leveled using sanding. Sometimes the floorboards arch, lifting slightly at the edges. It will not be possible to sand such a floor - there are a lot of nails. In this case, or if the gaps are too large, it is recommended to put sheet material on top of the boards - plywood, OSB, MDF. They are good because they do not have very high thermal expansion, and OSB does not yet absorb moisture (you can take moisture-resistant plywood), and this is important in wet rooms (in the kitchen, for example).

And fiberboard as a base for linoleum is not a very good option - when humidity increases, they swell, and the fiberboard goes in waves. After drying, the original shape is not restored, so the linoleum laid on top becomes hunched and wrinkled.
Before laying linoleum, you need to lay or. This is necessary if the plank floor “plays” and the boards sag. If you lay the coating directly on the boards, it will crack in the places where it bends, and quite quickly. This means replacing the floor covering, and problems with the boards are also possible - moisture can seep into the cracks.

This is what it means “with seams running apart”
When laying any sheet material to level the floor under linoleum, it is laid with the seams staggered so that they do not coincide (like brickwork). Small seams are left between the sheets, which are then filled with elastic (non-hardening) mastic.
Is it possible to lay new linoleum on the old flooring?
Let’s say right away that before laying linoleum, it is advisable to remove the old coating. But this can be problematic and then it is permissible to lay flooring on top of an existing one. This is true only if the old floor is smooth or unevenness can be repaired. New linoleum is laid on the old floor, on tiles, on parquet. If there are defects in the base - chips, dents, protrusions - they are eliminated, sealed with putty, trimmed, the seams between the tiles are rubbed down so that the surface is even.

Lay linoleum on parquet, tiles or other linoleum. But only under one condition - the base must be level
There are usually no problems with old linoleum as a substrate. If there are bumps, they are pierced, filled with glue, and the cracks are coated with a repair compound - cold welding for type “C” linoleum or sealant. When laying new linoleum on old one, there may be another problem - it will turn out too soft and significant depressions may form under the legs of the furniture.
On parquet, as well as on plank floors, it is advisable to lay a backing made of sheet material - the planks can also “walk”, tearing the coating.
To glue or not
Before laying linoleum, you need to decide whether you will glue it or not. There is an opinion that it is not necessary to glue it in houses and apartments. It is pressed against baseboards, furniture, large appliances, etc. All this “holds” him in place. Sometimes it works, sometimes it doesn't. It usually works on hard semi-commercial and commercial types of coating, but does not work on softer - household ones.
It's a matter of thermal expansion. In the summer, when it’s hot, linoleum expands, “creeping out” from under furniture and appliances. In the fall, it shrinks to its previous size, but does not return under the furniture. Waves and bumps form. Therefore, the majority agrees that it should be fixed.

If you don't glue it, it might look like this
Just keep in mind that linoleum either does not need to be glued at all, or glued completely. Glue it in some places - you are almost guaranteed to get humps and swelling after a while.
What to glue
Before laying linoleum, you need to figure out what to glue it with. If the room is small, lay household linoleum in one piece on a smooth base (sheet material, old linoleum, etc.), you can fix it with double-sided tape. It is secured securely, but due to thermal expansion, humps may form between the tape strips. Therefore, if you glue linoleum, then use glue.
There are two types of adhesives:

The first option is more familiar to us, but when changing the coating you have to suffer for a long time, tearing off the coating and glue residues from the base. The fixation holds the “shift” no less reliably, but allows you to easily re-lay it several times (from 5 to 8 depending on the composition).
Fixations
Fixations are used for laying household and semi-commercial linoleum. If we talk about the price per liter, then fixation is much more expensive. But its consumption is much less (100-180 g/square), so gluing one square meter will be cheaper. From all points of view, this is the best option. Here are some normal fasteners to work with:

There are other manufacturers, new products appear every day. But, before purchasing, read the instructions carefully. See that it can be used on your base, with your type of coating.
Adhesive for linoleum
You should definitely not use solvent-based glue (neoprene). Technologies have changed so that such glue produces a color change (red spots appear). This glue can only be used to glue marmoleum (a material based on natural ingredients).
If you decide to use glue, here are the brands that give good results:

If you need to save money, household linoleum “with a pile”, on a jute or foam base, can be glued to PVA or Bustilat M. If it is placed on concrete, screed or other similar coating, first the glue is diluted with water (1 to 1), and the surface is primed with this composition (maybe twice). Then PVA or Bustilat is applied and the coating is rolled out “on wet”.
How to glue linoleum joints
There is a special glue for joining linoleum joints. It is called “cold welding for linoleum”. These are small tubes with a sharp spout, with which the composition is filled directly into the joint. It does not so much glue as it dissolves adjacent areas of the coating, creating a sealed seam.
There are two types of cold welding for linoleum:

When laying linoleum, naturally, type A is used. Pay attention to the instructions for use. They come in different types and require different drying times.
If you haven’t worked with cold welding for linoleum joints before, practice first on scraps. Once you have mastered the technology and understand what and how to do, you can start gluing joints indoors.
One more point: the glue for joining linoleum joints does not polymerize until it releases harmful substances. Therefore, windows and doors are opened in the room, providing ventilation. It’s better to work with gloves, and a respirator won’t hurt.
How to lay linoleum with your own hands
In order for self-laid linoleum to be pleasing to the eye, not to swell or wrinkle, it is necessary to fulfill several mandatory points. The first is related to the preparation of the foundation. You already know that it should be even. In addition, it must be dry and clean. No dust or any grease or other stains. We collect everything with a vacuum cleaner, remove stains with a suitable product, and dry everything thoroughly. We do all this carefully: dust impairs adhesion to the base, and debris particles will eventually appear through the coating.

The second mandatory condition: before laying linoleum, it must “rest” for some time in a straightened state. Preferably at the installation site. It is rolled out and left for at least 2 days, but better - for 5-7 days. So it straightens out and takes on “working” dimensions. After this you can start cutting.
How to trim
Let's start with how to cut linoleum. There are two options - a knife and scissors. Both can work normally, they just have to be sharp.
Some people find it more convenient to use a stationery knife, but a shoe knife or a sharp kitchen knife will also work, although there are special ones. They have a retractable blade, like stationery knives, but their handle is curved and the blade almost does not bend.

On a utility knife, the ridges that hold the blade must be iron. In this case, the blade is more elastic and there is less chance that the cut will go to the side. It is precisely because the blade can “lead” that some craftsmen prefer powerful scissors. To make cutting easier, they make an incision, and then, without making cutting movements, they simply rip the coating along the intended line.
Now about where to trim. Roll out the linoleum so that it extends slightly onto the walls. If there are several canvases, an overlap of at least 5 cm is made at the junction. If there is a pattern, lay out the canvases so as to achieve a match. Then the connection point will not be noticeable.

The linoleum is cut in the corner, the joint remains overlapped and is trimmed after gluing the main part. The canvas is pressed to the floor and cut off with a knife or scissors. Please note that if work is carried out in a cool room, in summer the coating will increase in size due to high temperatures. If you cut the canvas close to the wall, in the summer a roller will form near the baseboards. Later, at lower temperatures, it can stretch, but in the summer it spoils the appearance. Therefore, when cutting, retreat from the wall about 1 cm.
Glue to the base
If you decide to lay linoleum without gluing, it is usually fixed along the baseboards with double-sided tape. The same material is glued in the door area. In this case, turn away the edges and stick tape on the base. We return the edges to their place and carefully level the coating. After making sure that it lies flat, without distortions or waves, remove the protective tape from the tape and glue the covering.
If you work with glue, you do things a little differently. Roll the covering up to half its length. The composition is applied to the floor (strictly according to the instructions). If there is a joint, a strip about 35 cm wide without glue is left on both sides of it. After waiting the time prescribed according to the instructions, the linoleum is rolled out again and pressed well.

The technology requires a pressure roller - a heavy cylinder (about 50 kg in weight), movably mounted on a handle, which squeezes out air and presses the coating to the base, ensuring good adhesion. If there is no roller, take a plastic trowel, which you use and press everything well. You can use a board wrapped in felt or felt or something similar.
Then glue the other side. If the canvas was laid in one piece, we can assume that the installation of linoleum is completed. All that remains is to secure the baseboards. If there are any joints, we continue.
Seam processing
If there are two or more canvases, the seams will need to be processed. There is a simple way - take a T-shaped metal strip and secure it at the joint (attached with screws or dowels, depending on the type of base). The method is not very aesthetic, but reliable. This is exactly what they do if two pieces of linoleum with different colors are joined under the door.

A more aesthetically pleasing way is to use cold weld linoleum glue. First you need to trim off the excess material at the joint. We take a metal ruler (a level or a rule will do), apply it at the joint, cut both sheets along it with a knife, and remove the excess strips. It is very important to cut through both sheets at once. In this case, if the pattern is chosen correctly, the connection is imperceptible, since the two canvases match perfectly. If the base under the linoleum is hard, you can put something soft under the joint - a piece of felt, linoleum, etc. Then it will be easier to cut both sheets at once.

We unscrew the non-glued parts of the coating along the seam, apply glue, wait, if necessary, the time according to the instructions, glue the coating in place, and roll it with a roller. We wait the time required for the glue to dry (according to the instructions).
Next, we take cold welding for linoleum joints and wide masking tape. We glue the joint with this tape, then use a utility knife to cut it along the joint. This is necessary to protect the coating from accidental contact with the composition. It is chemically active and will melt the coating, leaving an unsightly stain. The next steps are:

If everything is done correctly, the joint is almost invisible. There is no need to test it yet - several hours are required for final polymerization. But that's all. Linoleum is laid and you know how to lay it yourself.
The question of the advisability of laying linoleum on wooden floors remains open for many owners, since wooden flooring has many advantages that linoleum is unlikely to beat. The article will discuss how to lay linoleum on a wooden floor in an old house so that the defective coating becomes beautiful and reliable.
Features of wooden floors
The specificity of wooden floors lies in the following features:
- first of all, wooden floors are a multi-layer “pie” structure, where in addition to the flooring there is a base of logs, thermal insulation and waterproofing;
- It is also worth considering that a certain microclimate is created under the wooden flooring with constant humidity and a small temperature range. Moisture entering such an environment dries quickly, since high-quality wooden floors have a good vapor barrier layer.
After laying linoleum on a wooden floor, the owner will disrupt this microclimate. This can lead to the most serious consequences: increased humidity, changes in thermal conductivity and deformation of base materials. To minimize the risk of such processes, it is necessary to create high-quality ventilation for the subfloor.

Even if you have already laid linoleum on a wooden floor with your own hands, it is not too late to create air ducts in the floor. Decorative grilles will help to harmoniously combine them with the interior of the room, which will look original in the photo and upon visual inspection. The result of creating such passages will be the absence of wood rotting, the formation of fungi and the proliferation of insects.
Preparation for installation of linoleum
By analogy with any work on laying floor coverings, linoleum can be installed only after preparing the rough surface (plank flooring). Before laying linoleum on a wooden floor, it is necessary to create a perfectly flat and strong base for it. Quite often, fiberboard is laid under linoleum on a wooden floor to level the surface.
Any changes in height or kinks in the flooring material can lead to the formation of cracks or burst areas during operation. It is impossible to restore linoleum, which means you will have to replace it, which entails new costs.

It is important to check wooden floors before laying linoleum for:
- creaking in certain areas;
- gaps between flooring elements and cracks in them;
- poor quality boards;
- mold, mildew, etc.
Any of the above defects, if detected, must be removed, but if there are many of them, then we are talking about a complete replacement of the coating. Before installing linoleum on a wood floor in an old home, it is worth considering the feasibility of completely replacing the flooring used as the base. It is quite possible that replacing it will solve all the problems and laying linoleum can be abandoned.
However, the article is not about alternatives to linoleum, but about how to lay linoleum on a wooden floor to get a radically new coating with excellent performance and visual characteristics. You can eliminate all the above defects yourself.
The procedure for restoring a wooden base consists of the following steps:
- creaking and wobbly boards need to be secured better;
- rotten and leaky ones - spot-replace with new ones;
- cracks and cracks - seal using special mixtures for working with wood;
- the final leveling is done by scraping.

However, even the steps described above will not help make the subfloor perfectly level, which means additional measures will be required. The easiest way is to use special materials to level the base, which will also have a wood structure.
We are talking about plywood and moisture-resistant fibreboards. If you are leveling a floor with a significant number of sagging boards, then it is better to use particle boards or gypsum fiber sheets.
Such materials are fixed to the base using an adhesive mixture and self-tapping screws. The combination of these two elements for installation will create a durable support for linoleum. In the photo and upon visual inspection, the base will give the owner a perfectly flat floor, which is very much appreciated by buyers.
When attaching a sheet leveler to a wooden floor, it is necessary to screw in the screws below the surface level (recess the caps) so that in the future, when sanding, you do not damage the equipment and then tear the linoleum on such elements.
It is necessary to lay sheet material in staggered intervals: laying is done end-to-end, but with some displacement (by analogy with the deck method of laying plank flooring). This will increase the stability of the base and distribute the load created by the residents evenly over the entire area of the room.
Choice of linoleum
Before studying the instructions on how to properly lay linoleum on a wooden floor, you should decide what type of material to purchase for installation.

It should be selected according to a number of criteria:
- purpose by type of room: semi-commercial material - for kitchen units, corridors and hallways, household option - for bedrooms and other rooms with a small number of visitors;
- the width of the linoleum sheets is very important, since it is much easier to lay one sheet than two end-to-end;
- The thickness of linoleum must exceed 3 millimeters.
Beginning of work
When asked about how to properly lay linoleum on a wooden floor, every specialist can say with confidence that the material must be adapted to the conditions of the room where the installation will take place.
For this purpose, linoleum is brought into the room and unfolded on the floor (for a couple of days) so that it acquires its optimal proportions under the temperature and humidity conditions of the room in which it will be used. Moreover, the material is deployed only indoors, and transportation occurs in its original state in the form of rolls.

The so-called compensation gap is necessary in case the sheets expand when the room temperature rises. When stuck against the wall, the linoleum will swell, and a centimeter margin is quite enough to avoid such problems. The gaps will be closed using skirting boards and there will be no visual discomfort in the room.
Installation algorithm
All further actions are performed in a certain sequence:
- a sheet of linoleum should be folded in half lengthwise and placed on one half of the room;
- the unoccupied area of the floor is coated with the adhesive mixture using a roller or brush;
- after 10-15 minutes, when the glue gets a little stuck, you need to bend the top edge of the sheet and secure it to the coated area;
- You must immediately take a clean roller and use it to smooth out any unevenness (without pressing too much) remaining after installation;
- then the second part of the sheet is turned over onto the already laid half of the floor, and the glue squeezed out on the floor is removed with a rag or sponge. It is impossible for glue to get on the linoleum from the outside, as this will lead to the formation of stains that cannot be removed by anything;
- for the second sheet the algorithm of actions is similar;
- at the end, you need to let the floor dry for 24 hours and secure it around the perimeter of the baseboard to complete the finish.

In fact, there are only a few problems that may arise during installation:
- difficulty leveling the wooden base;
- the need to use two sheets of material.
If we have figured out how to level the base, then how to lay linoleum on a wooden floor in two stripes will be discussed further: without delving into the process, but with a description of its main stages.
Installation of linoleum on a wooden floor in two stripes
There are several options for laying linoleum in two stripes, but the simplest is overlapping and then trimming the top layer. When working, you must use a sharpened knife and a long wooden strip (rule).
The resulting sheets are laid by analogy with the previous section, written for single-strip installation. An additional measure is to pour an adhesive composition similar to a sealant into the joint.

There is a more complex method that requires the use of a welding machine and a polymer cord. Using the machine, this cord can be poured into the seam between the sheets. Beginners will never be able to cope with such a procedure on their own, and therefore they will need the help of specialists.
Less applicable is the method using double-sided self-adhesive tape, which is used to cover the perimeter of the room. This installation option is not the most reliable, and there is a risk that the tape will be of poor quality, which means that the linoleum will peel off within a minimum period of time after putting it into operation.
Bottom line
The article describes in detail how to properly lay linoleum on a wooden floor on your own, and it certainly becomes clear that this is not the easiest thing to do. To get the most durable and even floor covering, you should show maximum care, accuracy and patience.
It is best to contact specialists who will take responsibility for all stages of installation - from selecting the necessary materials (taking into account the wishes of the owner) to laying linoleum and putting it into operation.
Linoleum is a universal coating that can be laid in a variety of places and conditions, as well as on various types of substrates. It is often used to cover wooden floors made of boards or lined with plywood. Linoleum perfectly protects the surface from excess moisture, and at the same time it looks very nice, because the material can have any color, and choosing the color you like is not difficult. And it’s not at all difficult to lay it yourself. Today we’ll talk about how to lay linoleum on a wooden floor.

Before we talk about the linoleum flooring itself, it is worth noting several specific features of a wooden floor. This will help you understand why this type of finish and this type of base are absolutely compatible.
The floor, made of wood, has a multi-layer structure. It consists of joists on which wooden floorboards are laid. In the space remaining under the boards, various communications can be located, as well as layers of insulation and waterproofing. Thus, the floorboards are protected from moisture coming from below. On top, a layer of linoleum, which is not afraid of water, will help protect them from it. In general, of course, the wooden floor itself is breathable, it has good vapor permeability, but still excess moisture is harmful to it.


Not only the owners of newly built country houses, but also the owners of city apartments of old housing stock are puzzled by the problem of laying linoleum on the floor.
But linoleum can also have a negative impact on a wooden floor. If ventilation is not provided under the floorboards, then moisture willy-nilly will accumulate in the area where the joists are located, because linoleum will not allow it to escape outside and will disrupt the microclimate created under the floor.
However, the linoleum-wood floor combination is one of the best finishing options. Very often, it is this type of finishing coating that allows you to restore the former beauty of the base again. It's simple - boards lose their appearance over time; if they are painted, they constantly need to update the paintwork, which peels off. And thanks to linoleum, you can get a beautiful appearance of the floor quite quickly. At the same time, the coating is durable and will not require updating for many years, unlike the same paint.

On a note! Wooden flooring is considered environmentally friendly; it is optimally suited for installation in apartments where people who take responsibility for their health live. And linoleum, although it is a synthetic material, will never be a source of harmful substances. Therefore, these two materials - wood and linoleum - may well be neighbors.

What kind of linoleum is used on wooden floors?
Any type of linoleum is distinguished from other materials used for finishing by the following positive characteristics. This type of coating is quite durable, has a long service life, is easy to maintain, is not afraid of water, and has a reasonable price with a wide variety of colors and textures. And there are quite a lot of types of linoleum, among them it is easy to choose the type of coating that will be optimal in terms of price and quality.

Table. Main types of linoleum.
| View | Characteristic |
|---|---|
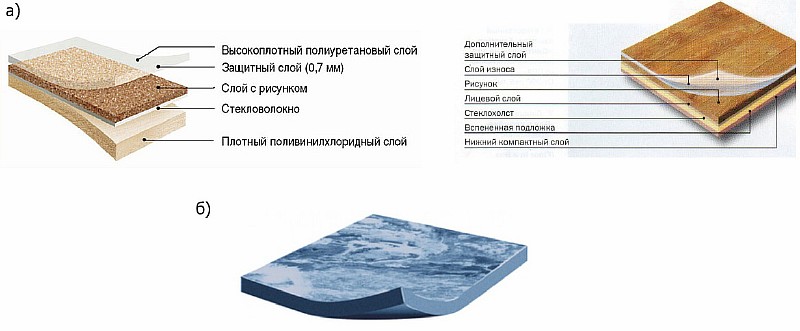
| An artificially created polymer is used to make this type of coating. The material may have several layers, a different base or not have it at all. The thickest version of this linoleum usually has a foam base and consists of four layers. Its thickness is at least 4 mm. The bottom layer is made of foamed vinyl, followed by a reinforcing layer made of fiberglass. The PVC layer sets the selected color of the material, and also protects the material from negative influences from the outside. This material has improved heat and sound insulation characteristics. |
| This linoleum is called “relin”. This is a multilayer material with a thickness of about 3 mm. It is made on the basis of bitumen, crushed rubber or rubber. The upper part is made of thin colored rubber. The material is elastic and not afraid of water. |
| This type of coating can have a thickness from 2 to 5 mm. Special pigments, fillers and alkyd resins are used for production. The material is resistant to abrasion, can have different colors, and has excellent sound and heat insulation properties. But in general it is a rather fragile species that can be easily damaged at a break. |
| Material that does not have a base. Nitrocellulose is used in its production process. The coating is highly resistant to moisture, does not burn, and is very elastic. |


Note! There is also thinner PVC linoleum on sale, up to 3 mm thick. Usually in this case the bottom layer is represented by felt. It also has a fiberglass layer covered with PVC film. If fabric-based linoleum, it does not have a fiberglass layer. The material is not afraid of abrasion and is quite resistant to various factors. Baseless linoleum- the thinnest. It does not have any backing and is usually installed where the floor surface will experience maximum moisture exposure.

Of course, linoleum made from PVC is most often used. Compared to other types, it has a relatively low cost, but at the same time has high quality indicators.

Any type of linoleum can be laid on wooden floors. But it is still recommended to take material with sufficient thickness. If you look at the classification of linoleum, then for use at home it is recommended to purchase a semi-commercial version.
On a note! There are also domestic linoleum, characterized by the smallest thickness, and linoleum commercial, which is the thickest and toughest type of coating, ready to experience maximum loads.
When choosing a material, it is important to take into account the operating conditions. For example, in high-traffic areas in residential buildings, only a semi-commercial option is installed - the household option will quickly lose its appearance. But in the bedroom or nursery, the first one can be the best solution, especially if you want to save money. In any case, it is not recommended to buy a coating less than 3 mm thick.


Methods for laying linoleum
Linoleum on a wooden base - just like on another type of base - can be laid in several ways. In general, they are divided into adhesive and non-adhesive. In the first case, the material is simply rolled out on the base and fixed around the perimeter of the room with plinths. But this option is only suitable for small rooms with low traffic, otherwise the material can easily move and waves will appear on its surface.

The adhesive method can be divided into two subtypes - using glue or using double-sided tape. In both cases, the fixation will be quite reliable, but still, for rooms where the floors are under significant load, only the option using an adhesive composition will be optimal.
On a note! Typically, linoleum is laid with glue only in rooms with an area of more than 20 m2.

Rules for laying linoleum on a wooden floor
In order to properly lay linoleum on a wooden floor, it is recommended to follow several rules:
- It is recommended to lay the material so that it lies along the direction of the boards;
- when joining individual sections of the covering, you need to ensure that the joint is in the middle of one of the floor boards;
- the temperature in the room while laying linoleum should not exceed 20 degrees. But it shouldn’t be too cool here either;
- material with a marble pattern should run perpendicular to the window, then the joints will be less noticeable. In general, linoleum must be laid taking into account the direction of incidence of light rays;
- if the coating will stick to the base and there will be joints on it, then it is important not to forget to leave an overlap of about 8-10 cm. Only in this case will it be possible to beautifully and neatly connect two pieces of material.

Required tools and materials
To lay linoleum on wood floors, you will need to purchase not only the coating itself, but also certain tools and materials. This could be a tape measure and other measuring materials, a knife for cutting the coating, a notched trowel (if using the adhesive fixation method), a roller for rolling the surface, putty for sealing the seams between the boards.

VX75 - knife for cutting linoleum
To implement the adhesive fixation method, you will need to purchase special glue or double-sided tape. For additional leveling of the floor, plywood, as well as nails or screws, can be useful. If installation involves joining individual strips of linoleum, then you need to buy one to connect them inconspicuously.


Laying linoleum on a wooden floor is a troublesome task, especially its preparatory part. But this only applies to those cases where the surface is not smooth enough. If the linoleum itself is of high quality, the floor is leveled, laying the covering will be successful even for a beginner.
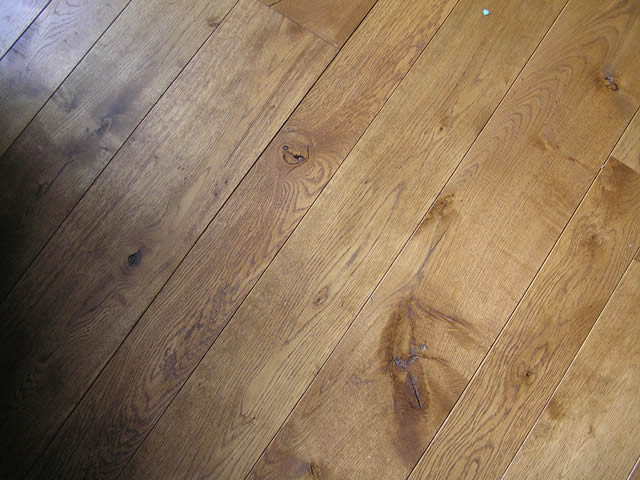
The most labor-intensive job is laying linoleum on an old plank floor. Avoiding unevenness in this case is not easy, but the task is doable, you just need to tinker a little longer.
Before laying linoleum on a wooden floor, you need to start preparing this very floor.

It starts with assessing the condition of the surface. Even if you can’t call it perfectly level, if it doesn’t creak or wobble, there will be much fewer problems.
An important point before installation is the elimination of fungi and rot. If there is no mold, the nail heads are not rusty, the boards do not show signs of deformation by insects, there will be less hassle. If you see rotten boards, it is correct not to ignore this fact, but to replace them - otherwise, the rot will continue.
If the floor sag or creaks, you will have to place blocks under the floorboards and/or pour talc into the cracks.

So, subject to correction:
- Creaking boards;
- Rotting or rotten boards;
- Cracks in boards;
- Recesses between boards, gaps;
- Remains of old paint on the boards.
Old paint can be removed using a spatula and a hair dryer. The latter will warm up the floor, after which the paint will be removed with a spatula.
Preparatory work
If the floor is strong enough, but its surface is uneven, a sanding machine or plane will help. Many people prefer to scrape the floor by hand, but this will take a lot of time and take a lot of effort.
A mandatory point is the deepening of the nails. All cracks between the boards must be filled.
The surface needs to be treated, because all irregularities will certainly appear on the linoleum. If the floor unevenness is not so harmless and has differences in its height, you cannot limit yourself to just sanding.

Floor leveling methods


The most common methods:
- Leveling with sheet material;
- Leveling with a special mixture.
The second method is more popular because it is more familiar. For this case, plywood, fiberboard, furniture panels, and hardboard are used. If the purpose of these manipulations is only to eliminate unevenness, it is very important to fix the sheets correctly. Fiberboard or plywood is secured with a special glue for parquet, and then nailed to the floor with nails, or, alternatively, with a construction stapler. Gypsum + PVA are often used as glue.


If the goal is to create a horizontal surface, the sheets will need to be laid on logs. The joists are made from plywood strips or blocks and are fixed to the floor with glue.
No matter how the fiberboard sheets are laid (here, in addition to fiberboard, we include plywood, panels, and hardboard), the seams are putty in any case. The final stage is to cover the surface with a layer of drying oil.
It may be a mistake to decide on additional thermal insulation (sometimes waterproofing), because it is this functionality that the linoleum base takes on.
Let's not forget about the simplest ones Preliminary steps required:
- Clean (including vacuuming);
- Wash;
- Dry.
Now you can start working directly with linoleum.
Preparing linoleum
We buy linoleum with a margin of at least 7-15 cm, and we also take into account the allowance for thermal shrinkage.
When transporting material, do not bend it; creases can easily occur. At home, linoleum is usually spread on the floor and “cured” for a couple of days. And rightly so: such an adaptation will help the material fit perfectly. It doesn’t matter what we have under the linoleum – whether it’s plywood, fiberboard or another material.
.jpg)


And a few more small tips:
- It is more advantageous to place single-color sheets in the direction of daylight;
- It is better to place linoleum joints in the middle of the board;
- Places for the battery and other protrusions are marked in advance, after which we carefully cut them out.
We fix and lay linoleum
You can also lay linoleum on fiberboard or plywood without fastening: but this is appropriate if the room is small. Maximum – 12 square meters. The canvas will be attached with skirting boards and a threshold in the opening.
Linoleum is often secured with double-sided tape. Usually, gluing along the perimeter of the canvas is sufficient, but sometimes additional strips stretch in the middle of the linoleum sheet, and are thus attached to plywood or fiberboard, or simply a leveled wooden floor.
The adhesive tape method takes place in stages: first, one side is peeled off and fixed, then the other, etc.

Placing linoleum on glue guarantees fastening strength; it is better to purchase a special glue created for this purpose. First, one part of the sheet is coated and glued, then the second. The surface should then be rolled with a roller, and the room should not be filled with furniture for at least seven days. That is, the linoleum will take another week to harden.
It happens that when laying linoleum, two pieces are connected. They need to be glued with a slight overlap. In the place of this overlap, two layers are cut off at once with a sharp knife (cut along a ruler). The so-called cold welding must be applied to the seam.
Laying linoleum (video)
Conclusion
Laying the linoleum itself goes quickly, and problems rarely arise in this matter. But floor unevenness shows through even the most perfectly fixed linoleum. Make sure that the plank floor is free of rotten boards, does not creak or wobble, make the surface level, and then in the second part of the event - installation - there will be no difficulties.
Linoleum is a popular material for finishing flooring. This finish is considered the easiest to install and is affordable. When working with a wooden surface, many people have a question about whether a backing is needed for linoleum, and what material to choose. This article describes in detail what to lay on a wooden floor under linoleum, and the technology for laying the underlay.
Benefits of the substrate
The underlay is a layer between the floor and the finishing coating. The material has many advantages.
- High levels of sound insulation prevent noise from penetrating into neighboring apartments in multi-storey buildings.
- Laying the underlay has good thermal insulation properties; it is used in rooms with a cold surface, especially if the room is not heated.
- Thanks to the interlayer, linoleum does not adhere tightly to the floor surface, due to this, minor flaws are hidden, that is, the material hides minor defects and creates an ideal coating.
The layers can have a linen, jute, cork or wood fiber base. You can use multi-layer linoleum, which has high sound-proofing and heat-insulating properties, and does not require laying an additional layer.
Choosing a wood floor underlay
Wooden coatings are distinguished by high environmental friendliness and thermal insulation characteristics, while the surface can wear out and requires updating. You can lay linoleum on a wooden surface without removing the floorboards if they are in good condition.
The underlay will increase the level of thermal insulation; it retains heat even in the harshest weather. When laying multilayer linoleum, it is not necessary to use a backing.
If the floors squeak, or if there are minor defects, it is necessary to apply a layer; this will help compensate for all surface irregularities and get rid of unwanted sound.
Leveling the surface of a wooden floor
The preparatory stage is to level the wooden surface under the linoleum, since in any case, depressions, cracks, bumps or nail holes form on the old coating.
For leveling, plywood with a thickness of about 7 millimeters is laid, this allows you to bring the floor to almost ideal condition. In case of significant gaps and defects, all irregularities are smoothed out and covered with wood putty, creating complete insulation of the surface.
If the floors are smooth and have minor defects, you don’t need to use plywood; it’s enough to level the boards with a planer or a grinder, push the nails into the surface to the maximum depth, and cover them with putty; in the same way, close the joints between the floorboards or other holes.
After completing the preparatory work, remove all small debris using a broom or vacuum cleaner; the device will help to thoroughly remove debris.

Correct installation of underlayment on wood flooring
When the floor is completely prepared and cleared of debris, the main work begins. First, the floors are covered with plastic film, this allows you to create high-quality insulation of the surface from moisture penetration.
Then the roll-type backing is spread end-to-end, all seams are sealed with construction tape or treated with sealant.
Using plywood underlayment will take more time and additional steps.
- Before laying linoleum, paint is removed from the wooden surface, then a primer is applied and left until completely dry.
- The substrate in the form of slabs or plywood is laid offset, leaving a gap of about 5 millimeters from the wall to the material. When the temperature changes, the material can acquire different sizes; the gap prevents deformation of the sheets during expansion.
- Self-tapping screws are reliable fasteners for the sheet substrate; they securely fix the plywood to the wooden floor surface.
- The edges are processed with a plane, all snags are removed, the holes from the screws are covered with putty.
- To fix sheet materials, you can use adhesives, but it is necessary to clean off the old paint or varnish.
Laying linoleum is not difficult; this material is convenient and easy to work with, which you can do yourself. Before final installation, the material must be leveled, the roll unrolled, and left for a day, after which it will take the desired shape.
The material is laid end-to-end, the edges are cut to the required size, lubricated with glue, and pressed to the surface, then the baseboards are installed.
Types of substrate and their characteristics
- The jute backing consists of natural fiber; it is highly resistant to rotting and fire due to the addition of a fire retardant. The material absorbs and removes moisture without remaining wet.
- For cork materials, chopped cork tree bark is used; the substrate has high environmental performance, since the composition does not contain synthetic inclusions. The layer has high levels of thermal insulation and sound insulation. There are also disadvantages of this insulation, a low degree of rigidity, which may leave marks on the furniture, and high cost.
- The linen layer provides good ventilation between the finish coating and the floor, since the material is double pierced during manufacturing. Such ventilation prevents the appearance of fungi and mold.
- The foam layer is a synthetic roll material, which is characterized by high heat and noise insulation, low cost, ease of installation, and practicality.
You can use combined materials of flax, jute, and wool; this layer is distinguished by its versatility, high wear resistance, and good insulation.

Cold floors in the room require laying an additional base under the linoleum in the form of a substrate. This will provide high thermal and sound insulation of the floor, protect the surface from the cold, so the underlay can be laid even in non-residential rooms. When laying linoleum, check the surface for strength, the wooden boards should not be rotten or rotten, in such cases the floorboards are replaced, all significant differences are leveled. Finishing material using a backing can hide small cracks or defects, but it is better to fill the holes to prevent the penetration of cold.
A backing for linoleum may not always be used; it is not required if a multilayer material is being laid. If the surface is cold or has minor flaws, laying a layer is mandatory; it serves as high-quality insulation for the floor. The work is quite simple; you can do it yourself, resulting in an ideal surface. The correct choice of material allows you to achieve the desired result, if linoleum has a high density and cost, and also in case of doubt about the performance of the work, you can resort to the help of specialists.